CrowdSec Cloudflare Worker

📚 Documentation 💠 Hub 💬 Discourse
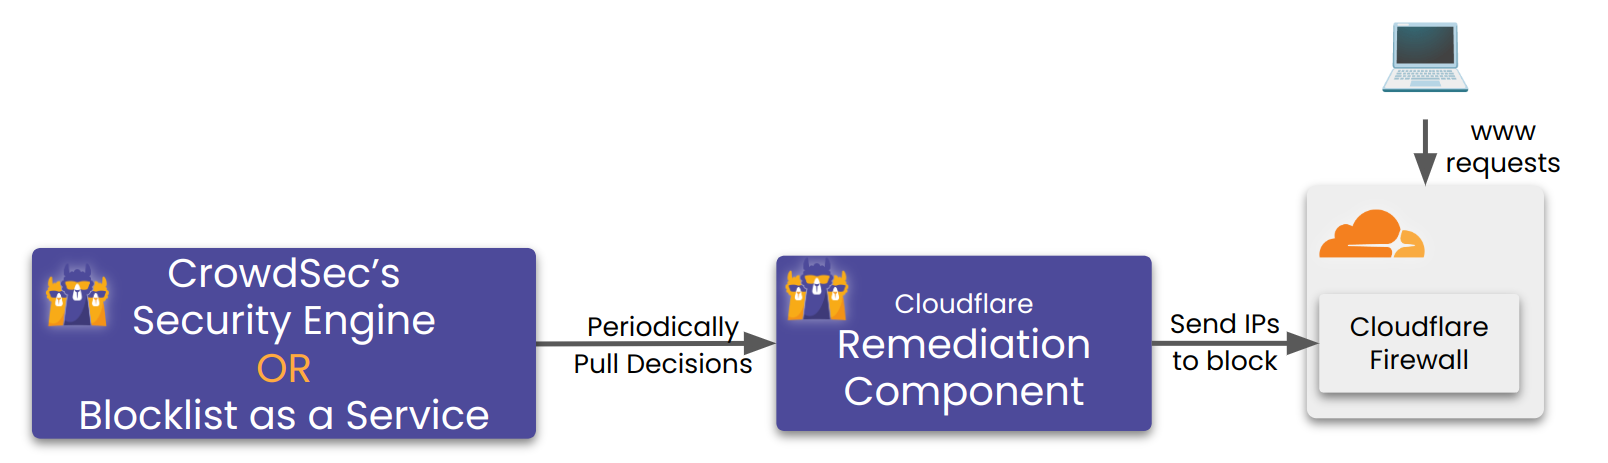
This Remediation Component (aka Bouncer) deploys a Cloudflare Worker in front of a Cloudflare Zone/Website, which checks if incoming request's IP address/Country/AS is present in a KV store and takes necessary remedial actions.
It also periodically updates the KV store with IPs coming from your CrowdSec Security Engine OR a Blocklist as a Service Integrationfor Remediation components.
Useful links:
- Register this remediation component into your Security engine: Here.
- To setup a Blocklist as a Service endpoint for a remediation component: Here.
The following documentation dives into the installation, configuration, and troubleshooting of the CrowdSec Cloudflare Worker Remediation Component.
This Remediation Component heavily relies on Cloudflare Workers and KV store. It works best on a paid Workers subscription. More explanation in the chapter Test with Cloudflare free plan
After configuring and starting the Remediation Component, please see the setting up worker fail mode section.
Installation
Using packages
Packages for crowdsec-cloudflare-worker-bouncer are available on our repositories. You need to pick the package accord to your firewall system :
- Debian/Ubuntu
- RHEL/Centos/Fedora
sudo apt install crowdsec-cloudflare-worker-bouncer
sudo yum install crowdsec-cloudflare-worker-bouncer
Then run the following commands to setup your Remediation Component:
sudo crowdsec-cloudflare-worker-bouncer -g <CLOUDFLARE_TOKEN1>,<CLOUDFLARE_TOKEN2> -o /etc/crowdsec/bouncers/crowdsec-cloudflare-worker-bouncer.yaml # auto-generate cloudflare config for provided space separated tokens
sudo vi /etc/crowdsec/bouncers/crowdsec-cloudflare-worker-bouncer.yaml # review config and set `crowdsec.lapi_key` if haven't alread
sudo systemctl start crowdsec-cloudflare-worker-bouncer # the Remediation Component now syncs the crowdsec decisions with cloudflare components.
Please configure your server to emit real IPs rather than cloudflare IPs in logs, so crowdsec can function properly. See how to here
If your Remediation Component is not installed on the same machine than LAPI, don't forget to set the crowdsec_lapi_url and crowdsec.lapi_key in the configuration file /etc/crowdsec/bouncers/crowdsec-cloudflare-worker-bouncer.yaml
You need to run sudo crowdsec-cloudflare-worker-bouncer -d to cleanup exisiting cloudflare components created by Remediation Component before editing the config files.
You can run sudo crowdsec-cloudflare-worker-bouncer -g <CLOUDFLARE_TOKEN1>,<CLOUDFLARE_TOKEN2> -o /etc/crowdsec/bouncers/crowdsec-cloudflare-worker-bouncer.yaml to generate the configuration by discovering all the accounts and the zones associated with the provided tokens.
Manual Installation
Assisted
Download the latest release.
tar xzvf crowdsec-cloudflare-worker-bouncer.tgz
cd crowdsec-cloudflare-worker-bouncer/
sudo ./install.sh
sudo crowdsec-cloudflare-worker-bouncer -g <CLOUDFLARE_TOKEN1>,<CLOUDFLARE_TOKEN2> -o /etc/crowdsec/bouncers/crowdsec-cloudflare-worker-bouncer.yaml # auto-generate cloudflare config for provided tokens
sudo vi /etc/crowdsec/bouncers/crowdsec-cloudflare-worker-bouncer.yaml # review config and set `crowdsec.lapi_key` if haven't already
sudo systemctl start crowdsec-cloudflare-worker-bouncer # the Remediation Component now syncs the crowdsec decisions with cloudflare components.
From source
⚠️ requires go >= 1.23
git clone https://github.com/crowdsecurity/cs-cloudflare-worker-bouncer
cd cs-cloudflare-worker-bouncer
make release
cd cd crowdsec-cloudflare-worker-bouncer-*
./crowdsec-cloudflare-worker-bouncer -g <CLOUDFLARE_TOKEN1>,<CLOUDFLARE_TOKEN2> -o /etc/crowdsec/bouncers/crowdsec-cloudflare-worker-bouncer.yaml # auto-generate cloudflare config for provided space separated tokens
sudo vi /etc/crowdsec/bouncers/crowdsec-cloudflare-worker-bouncer.yaml # review config and set `crowdsec.lapi_key` if haven't already
sudo systemctl start crowdsec-cloudflare-worker-bouncer
How it works
Note that in the following Schema, a Blocklist as a Service Integration can be substituted to the Security Engine.
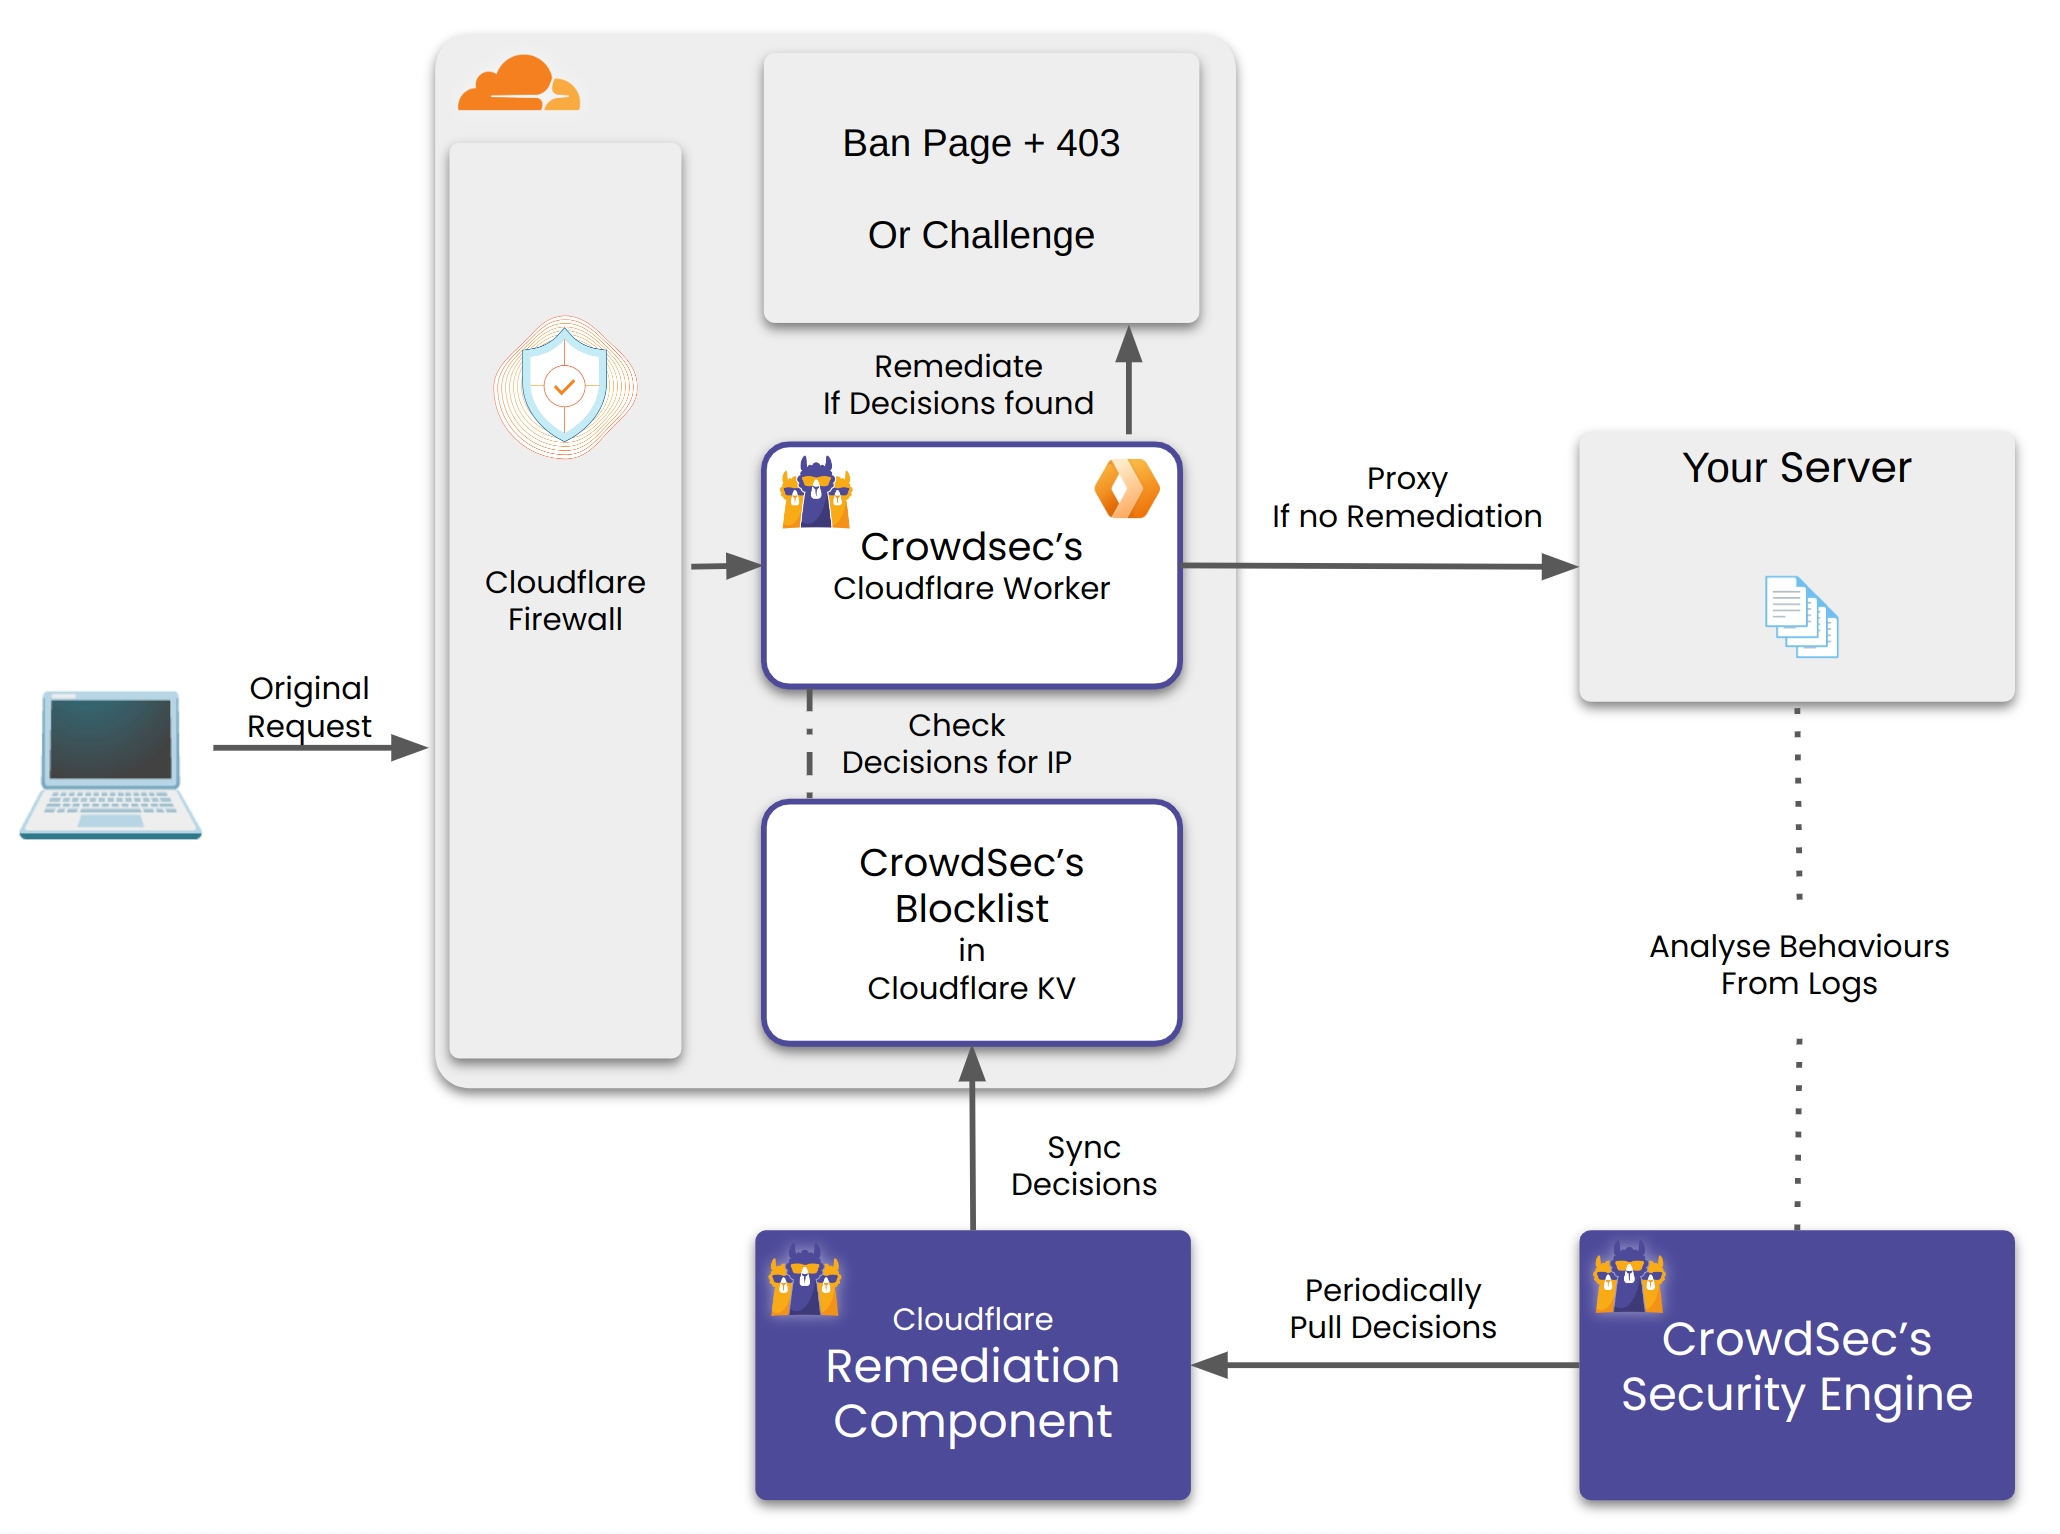
The Remediation Component does the following:
- Create a Cloudflare Worker and a Worker KV per configured account.
- Create a Worker Route(s) per configured zone. Any request matching the route would be handled by the worker.
- For every matching incoming request, the worker checks whether it's IP, Country and AS have a decision against. It checks for this in it's KV store. If found it performs the corresponding remediation.
- The Remediation Component also periodically updates the KV store with the latest decisions from CrowdSec's Security Engine OR Blocklist Integration.
If your Cloudflare token has permission on D1, the remediation component will also automatically create a database to track:
- Number of requests processed
- Number of requests blocked
Those metrics are exposed through the prometheus endpoint and automatically sent to crowdsec for visualisation with cscli.
Metrics are stored in a D1 database to allow for easy retrieval by the remediation component. If your token does not have access to D1, a warning will be logged and metrics will be disabled.
Configuration
crowdsec_config:
  lapi_key: ${API_KEY}
  lapi_url: ${CROWDSEC_LAPI_URL}
  update_frequency: 10s
  include_scenarios_containing: []
  exclude_scenarios_containing: []
  only_include_decisions_from: []
  insecure_skip_verify: false
  key_path: ""  # Used for TLS authentification with CrowdSec LAPI
  cert_path: "" # Used for TLS authentification with CrowdSec LAPI
  ca_cert_path: "" # Used for TLS authentification with CrowdSec LAPI

cloudflare_config:
    accounts:
        - id: <ACCOUNT_ID>
          zones:
            - zone_id: <ZONE_ID> # crowdflare.co.uk
              actions: # Supported Actions [captcha, ban]
                - captcha
              default_action: captcha # Supported Actions [captcha, ban, none]
              routes_to_protect: []
              turnstile:
                enabled: true
                rotate_secret_key: true
                rotate_secret_key_every: 168h0m0s
                mode: managed # Supported Modes "managed"|"invisible"|"non-interactive"
          token: <CLOUDFLARE_ACCOUNT_TOKEN>
          account_name: owner@example.com
    worker:
      log_only: false # If true, allow all requests, but still keep track of what would have been blocked in the metrics
      script_name: ""
      logpush: null
      tags: []
      compatibility_date: ""
      compatibility_flags: []

log_level: info
log_media: "stdout"
log_dir: "/var/log/"
ban_template_path: "" # set to empty to use default template

prometheus:
    enabled: true
    listen_addr: 127.0.0.1
    listen_port: "2112"
Cloudflare Configuration
Background: In Cloudflare, each user can have access to multiple accounts. Each account can own/access multiple zones. In this context a zone can be considered as a domain. Each domain registered with cloudflare gets a distinct zone_id.
For obtaining the token:
Ensure the token you are generating is a user API token these are found via clicking "my profile" and API Tokens. If you are in the Account API Tokens section then this is the incorrect place and these tokens have different rate limits which may cause issues whilst operating this Remediation Component.
- Sign in as a user who has access to the desired account.
Then click this link and create the token.
Alternatively, you can go to Tokens and create the token.
The Remediation Component requires the following permissions to function:
| Permission Group | Item | Permission |
|---|---|---|
| Account | Turnstile | Edit |
| Account | Workers KV Storage | Edit |
| Account | Workers Scripts | Edit |
| Account | Account Settings | Read |
| Account | D1 | Edit |
| User | User Details | Read |
| Zone | DNS | Read |
| Zone | Workers Routes | Edit |
| Zone | Zone | Read |
By default, the token will be scopped to all accounts / zones you have access to.
We recommend scoping the token only to the required accounts and zones.
This remediation component require each configured to have at least one A or AAAA records.
If you have zones without them (eg, with only CNAME records), exclude them from the scope.
The bouncer will try to automatically ignore such zones, but if it fails to do so for any reason, you might incur higher KV storage charges.
To automatically generate config, check the helper section below.
Helpers
The binary has built in helper scripts to do various operations.
Auto config generator
Generates config by discovering all the accounts and the zones associated with provided list of tokens.
Example Usage:
sudo crowdsec-cloudflare-worker-bouncer -g <TOKEN_1>,<TOKEN_2>...  -o cfg.yaml
cat cfg.yaml  > /etc/crowdsec/bouncers/crowdsec-cloudflare-worker-bouncer.yaml
This script only generates cloudflare related config. By default it refers to the config at /etc/crowdsec/bouncers/crowdsec-cloudflare-worker-bouncer.yaml for crowdsec configuration.
Using custom config:
sudo crowdsec-cloudflare-worker-bouncer -c ./cfg.yaml -g <TOKEN_1>,<TOKEN_2>...
Cloudflare Cleanup
This deletes all the Cloudflare infrastructure which was created by the Remediation Component.
Example Usage:
sudo crowdsec-cloudflare-worker-bouncer -d
Setting up the worker route fail mode
The Remediation Component creates worker routes to make the workers act as a reverse proxy for your origin servers. The worker routes are created with the failover mode set to Fail Closed. There's no public Cloudflare API we can use to change/update it to Fail Open mode.
With Fail Closed mode, Routes in fail closed mode will display a Cloudflare 1027 error page to visitors if there's an error within the worker. This error could be triggered due to quotas exceeding your plan etc. Cloudflare doesn't mention all the possible scenarios which could trigger this error page.
Thus we recommend you to manually override the failover mode to Fail Open for all the worker routes created by our Remediation Component. With Fail Open mode the requests would bypass the worker and be served directly from your origin servers. Thus your website would continue to function even if there's an error within the worker.
This can be done by following the steps below:
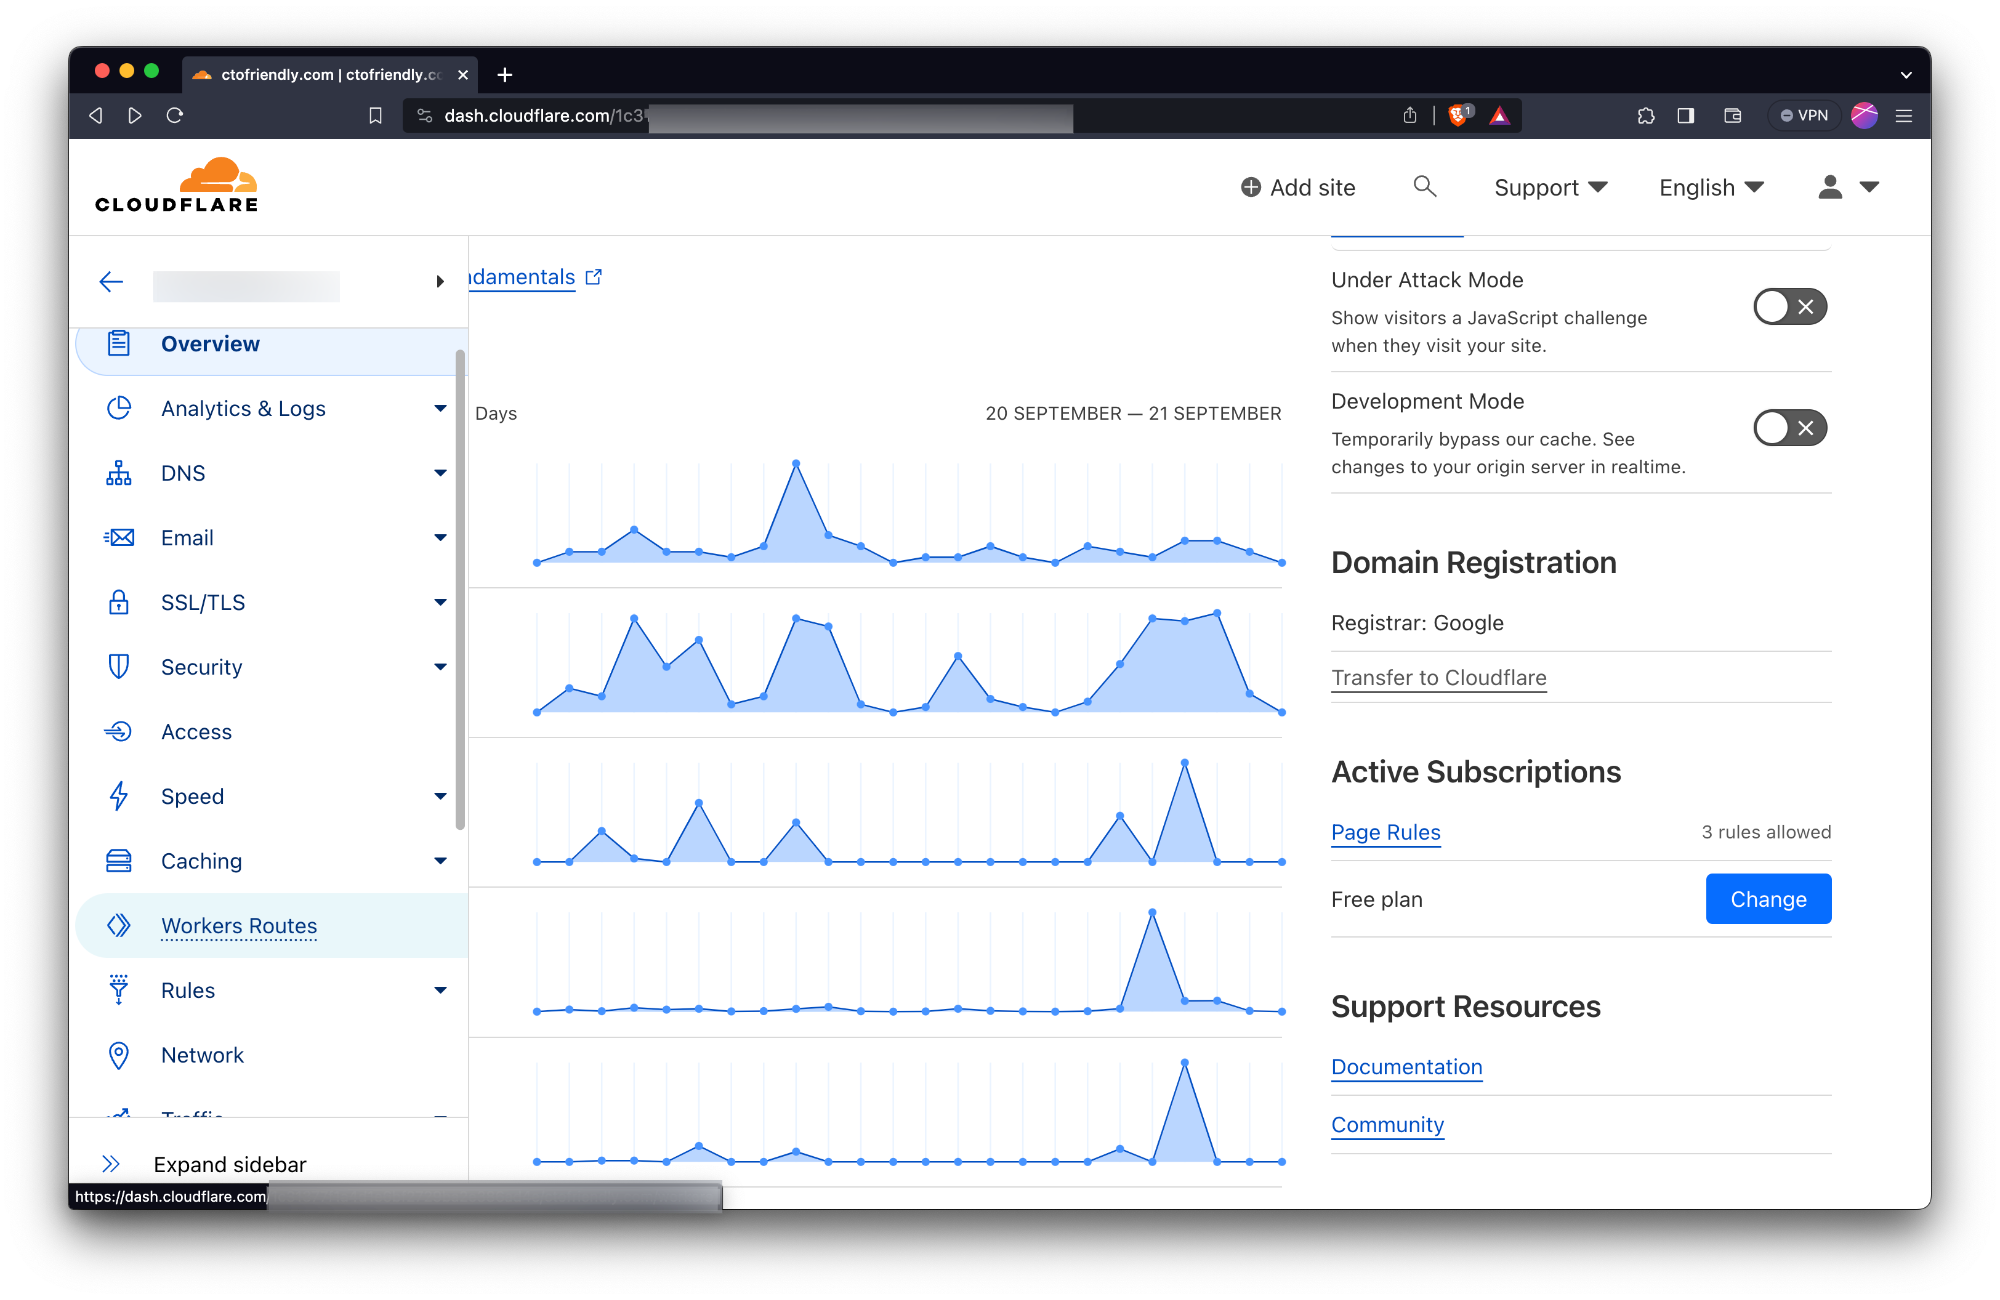
- Log in to the Cloudflare dashboard and select your account.
- For all the websites configured with the Remediation Component, do the following:
- Click on the website's name to open the Website's Overview page.
- Click on the Worker Routes tab from the left menu.
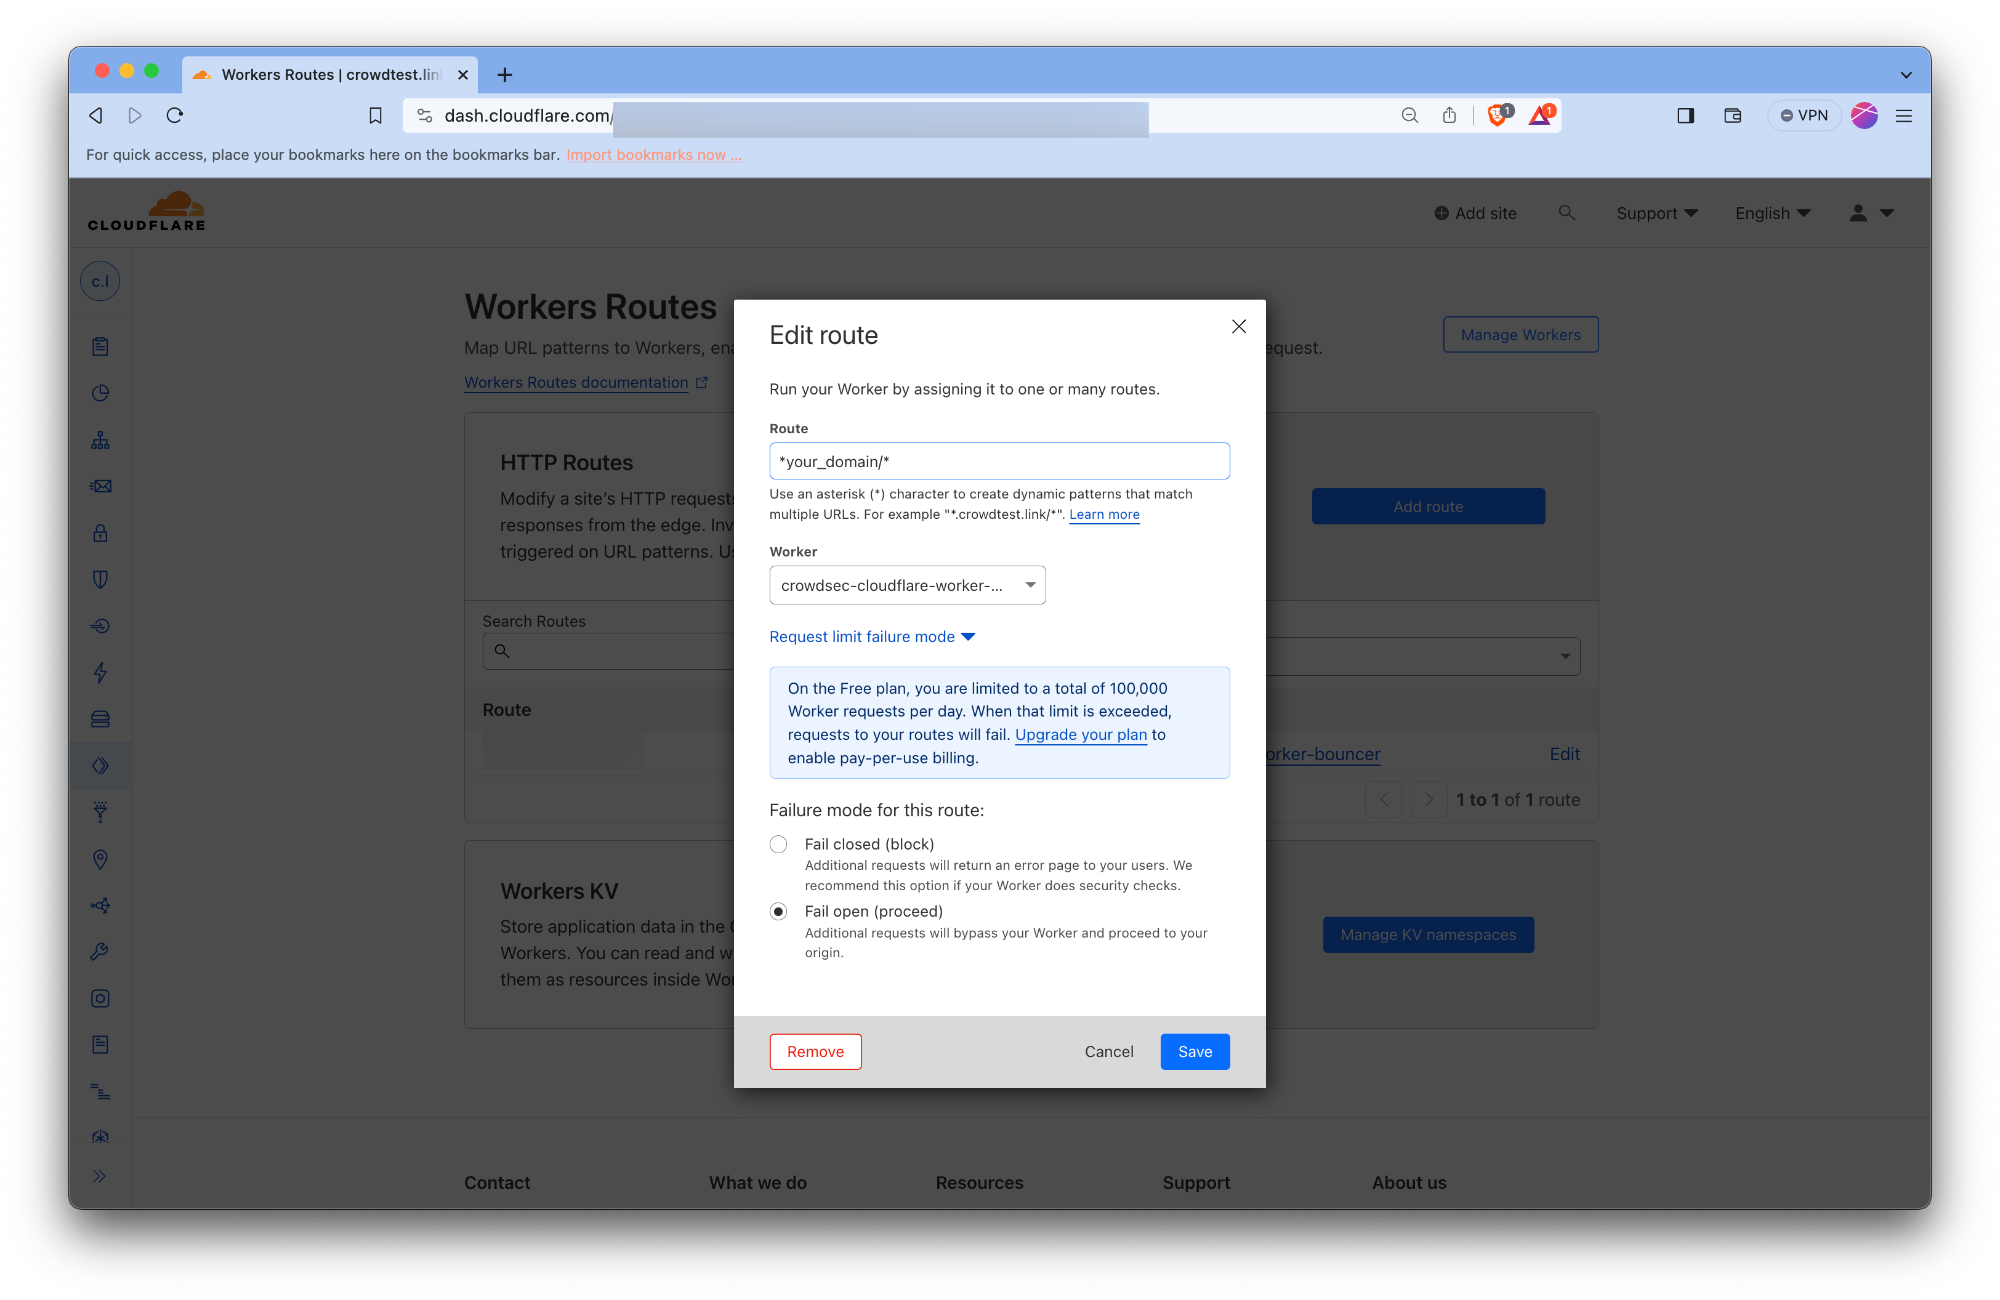
- Click on the route created by the Remediation Component.
- Click on the Edit button.
- Click on the Request limit failure mode. Check the Fail open button.
Appendix: Test with Cloudflare free plan
Using Cloudflare's free plan with our Remediation Component requires to understand the constraints of the CloudFlare freeplan.
Despite these constraints, it's entirely feasible to leverage the Remediation Component for enhanced security.
In this section we'll guide you through:
- An overview of the Cloudflare free plan's limitations and their impact on Remediation Component functionality
- A walkthrough for deploying the Remediation Component within these constraints successfully
Understanding Cloudflare Free Plan Limitations
Our Remediation Component integrates with Cloudflare Workers and Workers KeyValue storage, subject to specific thresholds under the free plan.
For the complete detailed information, refer to Cloudflare's official documentation:
Key limitations to note for Remediation Component operation on the free plan include:
- KV write: Up to 1K per day
- Worker Requests:Up to 100k per day or 1K per minute
KV write limit of 1K per day:
It's the primary limiting factor as the full decisions list (blocklist) passed on to the Remediation Component often exceeds tens of thousands of IPs.
- It implies that the initial population of decisions in the Worker's KV will be truncated to 1K
- However, it will still periodically receive new decisions and remove expired ones.
- So, eventually you'll have many more than 1K IPs in the KV but it still diminishes the immediate effectiveness of the Remediation Component
The request quota: While the request quota might seem ample, it's essential to remember that both legitimate traffic and potential attack patterns contribute to this total.
- ⚠️ It's primordial to properly setup the failmode
- With the failmode set to passthrough, when you reach the Worker request limits your service will stay available, but the Remediation Component won't apply remediation anymore
Quick Guide : Configuring the Remediation Component on Cloudflare's Free Plan
To adapt to the free plan's constraints, we can prioritize local decision-making and manual intervention over broader community-driven blocklists.
Here's how to set it up:
- Configuration Setup: Begin by auto-generating the Remediation Component configuration.
- Limiting Decision Sources: Modify the configuration to prioritize decisions generated by your Security Engine and added manually.
- Using the config parameter crowdsec.only_include_decisions_from
crowdsec_config:
[...]
only_include_decisions_from: ["cscli", "crowdsec"]
- Failmode Configuration: It's crucial to configure the failmode properly to ensure your service remains operational even when request quotas are reached.
- Testing with manual decisions: Verify the functionality by adding decisions manually, which should be promptly reflected in KV storage and enforced by the Remediation Component.
sudo cscli decisions add --ip 192.168.1.1 --type captcha
check your decisions has been added using:
sudo cscli decisions list --origin cscli
And within a few seconds it will be sent to the KV and the proper remediation should be applied to the requests from the specified IP
Configuration Reference
crowdsec
Used to nest the configuration related to crowdsec.
lapi_url
string
The URL of CrowdSec LAPI. It should be accessible from the Remediation Component.
lapi_key
string
It can be obtained by running the following on the machine CrowdSec LAPI is deployed on.
sudo cscli -oraw bouncers add cloudflarebouncer # -oraw flag can discarded for human friendly output.
update_frequency
string (That is parseable by time.ParseDuration)
The Remediation Component will poll the CrowdSec every update_frequency interval. (default: 10s)
include_scenarios_containing
[ ]string
Ignore IPs banned for triggering scenarios not containing either of provided word.
include_scenarios_containing: ["ssh", "http"]
exclude_scenarios_containing
[ ]string
Ignore IPs banned for triggering scenarios containing either of provided word.
exclude_scenarios_containing: ["ssh", "http"]
only_include_decisions_from
[ ]string
Only include IPs banned due to decisions orginating from provided sources.
only_include_decisions_from: ["cscli", "crowdsec"]
insecure_skip_verify
boolean
Skip verification of the LAPI certificate, usually used for self-signed certificates
key_path
string
Path to the private key file to use for TLS authentication with CrowdSec LAPI.
cert_path
string
Path to the certificate file to use for TLS authentication with CrowdSec LAPI.
ca_cert_path
string
Path to the CA certificate file to use for TLS authentication with CrowdSec LAPI.
cloudflare_config
Cloudflare configuration.
accounts[].id
string
The ID of the Cloudflare account.
accounts[].zones[].zone_id
string
The ID of the Cloudflare zone.
accounts[].zones[].actions
captcha|ban
Supported actions for the zone.
accounts[].zones[].default_action
captcha|ban|none
Default action to take for the zone.
accounts[].zones[].routes_to_protect
[ ]string
List of routes to protect within the zone. Example value ["example.com/"]
accounts[].zones[].turnstile.enabled
boolean
Enable or disable turnstile for the zone.
accounts[].zones[].turnstile.rotate_secret_key
boolean
Rotate the secret key for turnstile.
accounts[].zones[].turnstile.rotate_secret_key_every
string (That is parseable by time.ParseDuration)
Duration for rotating the secret key. Values should be in the format of 1h2m3s. Example value 168h0m0s for 7 days.
accounts[].zones[].turnstile.mode
Mode for turnstile. Supported values ["managed", "invisible", "non-interactive"]. See cloudflare-docs for more details.
accounts[].zones[].token
string
Cloudflare account token.
accounts[].zones[].account_name
string
Account name.
worker.log_only
bool
If true, allow all requests but keep track of what would have been blocked in the metrics.
Defaults to false
worker.script_name
string
Name to use for the worker script.
Default to crowdsec-cloudflare-worker-bouncer.
worker.logpush
bool
Enable logpush for the worker.
Default to no value.
worker.compatibility_date
string
See https://developers.cloudflare.com/workers/configuration/compatibility-dates/.
Default to no value
worker.compatibility_flags
list of strings
See https://developers.cloudflare.com/workers/configuration/compatibility-flags/.
Default to no value.
ban_template_path
string
Path to the ban template file. If not provided, the default template is used. This HTML would be rendered to requests when they are banned.
log_level
info|debug|error|warning|trace
Log level of the Remediation Component.
log_mode
stdout|file
Where the log contents are written (With file it will be written to log_dir with the name crowdsec-cloudflare-worker-bouncer.log)
log_dir
Relevant if log_mode is file. This determines where to create log file.
prometheus
Prometheus configuration.
enabled
boolean
Enable or disable Prometheus metrics.
listen_addr
string
Address to listen for Prometheus metrics. Example value 127.0.0.1
listen_port
string
Port to listen for Prometheus metrics. Example value 2112
Troubleshooting
- Metrics can be seen at http://localhost:2112/metrics

